Irresistible Peanut Butter Blossom Cookies: Your Guide to a Timeless Holiday Treat
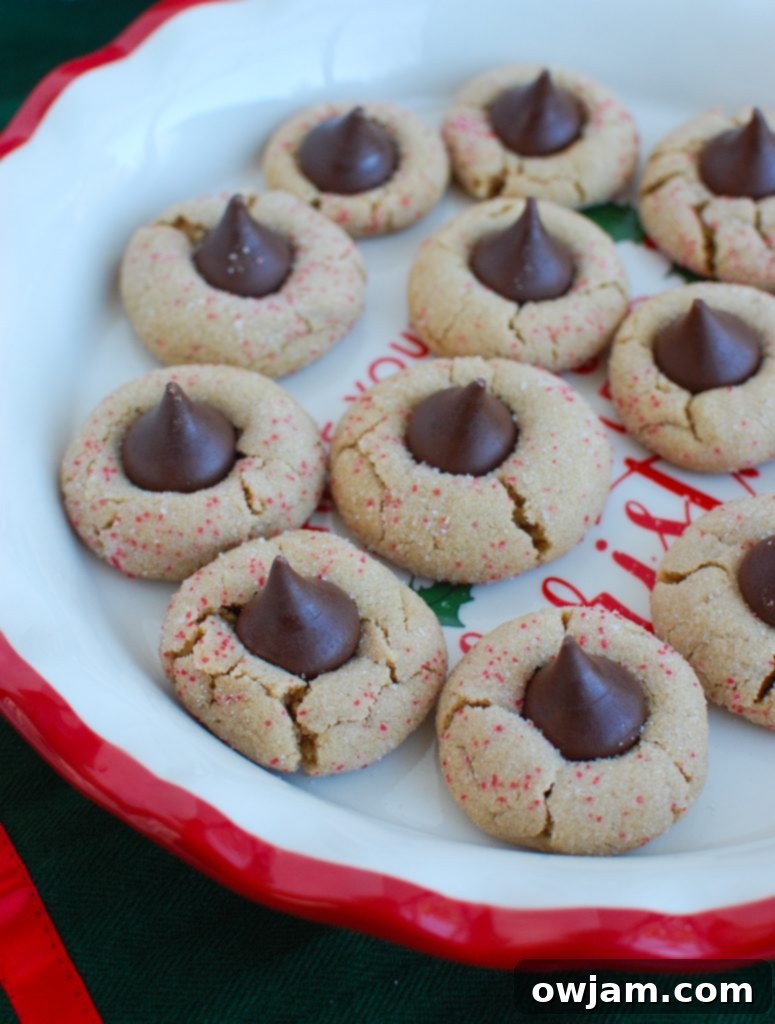
There’s something truly special about holiday baking, and for many, the **Peanut Butter Blossom Cookie** sits right at the top of that cherished list. These iconic cookies, with their soft, chewy peanut butter base and a perfectly melted Hershey’s Kiss nestled in the center, evoke a sense of nostalgia and warmth that’s hard to beat. They are not just cookies; they’re edible memories, perfect for sharing at a festive cookie exchange, adorning a holiday dinner table, or simply enjoying with a glass of milk by the fire.

For me, the holiday season wouldn’t be complete without an annual cookie exchange hosted by a dear friend. It’s a tradition I look forward to every year, a chance to share homemade treats and catch up with loved ones. This past year, I proudly contributed a fresh batch of these beloved Peanut Butter Blossom Cookies, and as expected, they were an instant hit. Their familiar taste and charming appearance always make them a crowd-pleaser.
While I’ve enjoyed these delectable cookies countless times throughout my life, this was one of the first times I ventured to make them myself. To my delight, the process was straightforward and incredibly rewarding. Paired with other favorites like my Peanut Butter Pretzel Chocolate Chip Cookies and festive Oatmeal White Chocolate Peppermint Cookies, they rounded out a truly spectacular dessert spread. There’s just something about cookies with peanut butter that I absolutely adore!
What makes Peanut Butter Blossoms so special is their perfect blend of textures and flavors. The cookie itself is delightfully soft and chewy, bursting with rich peanut butter goodness, while the melty chocolate kiss adds a creamy, sweet contrast. They’re surprisingly simple to bake, making them an ideal project for a fun family baking session. Children (and adults!) love pressing the chocolate kisses into the warm cookies fresh out of the oven. It’s a joyful, hands-on experience that creates lasting memories.
One of the joys of making Peanut Butter Blossoms is the opportunity for customization. While the classic milk chocolate Hershey’s Kiss is always a winner, I often enjoy experimenting with different flavors. Last year, I discovered s’mores-flavored Hershey’s Kisses, complete with a marshmallowy center, and used them for half the batch – a delightful twist that added an extra layer of fun and flavor!
The Anatomy of a Perfect Peanut Butter Blossom Cookie
Before we dive into the step-by-step process, let’s appreciate what makes these cookies so exceptional. It starts with a perfectly balanced peanut butter dough. The combination of both brown and white sugar contributes to the ideal chewiness and sweetness, while real butter and creamy peanut butter provide that irresistible rich flavor and tender texture. A touch of vanilla extract deepens the overall aroma, making these cookies truly enticing from the moment they start baking.
The signature element, of course, is the Hershey’s Kiss. Placed immediately after the cookies emerge from the oven, the warmth gently softens the chocolate, allowing it to meld beautifully into the cookie’s center. As it cools, the chocolate sets into a perfectly formed “blossom,” creating a visually appealing and utterly delicious treat.

Crafting Your Own Peanut Butter Blossoms: A Step-by-Step Guide
Making these classic cookies is simpler than you might think! Follow these steps closely for a batch of perfect Peanut Butter Blossoms every time. Remember, the key to great baking is often in the details and fresh, quality ingredients.
Step 1: Prepare Your Kitchen & Ingredients
Begin by preheating your oven to 375 degrees F (190°C). This ensures your oven is at the correct temperature when your dough is ready, promoting even baking. Line a baking sheet with parchment paper or a non-stick baking mat. Having all your ingredients at room temperature, especially the butter and egg, is crucial for a smooth, well-emulsified dough. Unwrap your Hershey’s Kisses ahead of time; you’ll want them ready to press into the hot cookies without delay.
Step 2: Cream Wet Ingredients for Fluffy Dough
In the bowl of a stand mixer fitted with a paddle attachment (or using a hand mixer), combine the softened butter, creamy peanut butter, 1/2 cup of firmly packed brown sugar, and 1/2 cup of white sugar. Beat these ingredients at medium speed until the mixture is light, fluffy, and well combined. This creaming process incorporates air, which contributes to the cookies’ soft texture.
Step 3: Introduce Egg & Flavor Enhancers
Add the room-temperature egg, vanilla extract, and salt to your creamed mixture. Continue to beat at medium speed until all ingredients are thoroughly incorporated. The egg provides structure, while vanilla and salt enhance the overall flavor profile of the peanut butter.
Step 4: Gradually Add Dry Ingredients
In a separate bowl, whisk together the whole wheat flour (or all-purpose flour) and baking soda. Gradually add these dry ingredients to the wet mixture, beating on low speed until just combined and a soft dough forms. Be careful not to overmix, as this can lead to tough cookies.
Step 5: Roll and Chill for Perfect Shape
Scoop the dough using a tablespoon or a 1-inch cookie scoop. Roll each portion into a smooth, uniform ball. Then, roll each dough ball generously in the reserved 1/4 cup of white sugar. This sugar coating creates a delightful sparkle and a slightly crisp exterior. Place the sugared dough balls about 2 inches apart on your prepared baking sheet. For best results and to prevent spreading, refrigerate the cookies for at least 30 minutes before baking. This chilling step helps the butter solidify, ensuring the cookies hold their shape better in the oven.
Step 6: Bake to Golden Perfection
Bake the cookies in your preheated oven for 8-9 minutes, or until the edges are lightly golden brown. The centers should still appear soft. Remember that ovens can vary, so keep an eye on them. Overbaking can result in a dry cookie, so err on the side of slightly underbaked for a chewier texture.
Step 7: The Signature Kiss & Cooling Process
Immediately upon removing the hot cookies from the oven, gently press an unwrapped Hershey’s Kiss into the center of each cookie. The residual heat will slightly melt the chocolate, allowing it to adhere beautifully. Let the cookies cool on the baking sheet for about 3-5 minutes. This allows them to set slightly before transferring. Then, carefully move them to a wire rack to cool completely. Cooling on a rack promotes air circulation, preventing soggy bottoms and ensuring even cooling.
Step 8: Store for Lasting Freshness
Once completely cooled, store your Peanut Butter Blossom Cookies in an airtight container at room temperature for up to 4 days. If you’re looking for longer storage, see our freezing tips below!

Tips for Peanut Butter Blossom Perfection
- Room Temperature Ingredients: Always ensure your butter and egg are at room temperature. This helps them cream together smoothly, creating a uniform dough texture.
- Don’t Overmix: Once you add the flour, mix only until just combined. Overmixing develops gluten, which can make your cookies tough and dry.
- Chilling is Key: Don’t skip the 30-minute refrigeration step! It helps the dough firm up, preventing the cookies from spreading too much in the oven and maintaining their classic shape.
- Uniform Size: Use a cookie scoop to ensure all your cookies are roughly the same size. This leads to even baking and a professional-looking batch.
- Hershey’s Kiss Variations: Get creative with your kisses! Beyond the classic milk chocolate, try dark chocolate, white chocolate, caramel-filled, peppermint, or even the s’mores variety for different flavor profiles.
- Avoid Overbaking: Peanut butter cookies are best when slightly soft in the center. They will continue to set as they cool. Look for lightly golden edges, not deep brown.
- Cooling Rack Essentials: Transferring cookies to a wire rack after a few minutes on the hot baking sheet is crucial. It stops the cooking process and allows them to cool evenly, preventing condensation and soggy bottoms.
Storage and Freezing Your Peanut Butter Blossoms
Peanut Butter Blossom Cookies are fantastic make-ahead treats, especially during busy holiday seasons. Knowing how to properly store or freeze them can save you a lot of time and ensure you always have a delightful batch on hand.
How to Store Freshly Baked Cookies
Once your Peanut Butter Blossom Cookies have completely cooled, transfer them to an airtight container. They will stay wonderfully fresh at room temperature for 3-4 days. To help maintain their softness for a longer period (up to two weeks!), try placing a slice of plain white bread in the container with the cookies. The cookies will absorb moisture from the bread, keeping them moist and chewy. Just remember to replace the bread every couple of days if it becomes stale or hard.
Can I Freeze Peanut Butter Blossoms?
Absolutely! These cookies freeze exceptionally well, making them an excellent candidate for advance preparation. Freezing is a fantastic way to get a head start on your holiday baking or simply to enjoy these delicious cookies whenever a craving strikes.
- Freezing Baked Cookies: Allow the cookies to cool completely on a wire rack. Once fully cooled, arrange them in a single layer on a baking sheet and freeze for about an hour, or until solid. This “flash freezing” prevents them from sticking together. Once solid, transfer the frozen cookies to an airtight freezer-safe container or a heavy-duty freezer bag. You can stack them with parchment paper in between layers to protect the chocolate kisses. They will keep well in the freezer for up to 2-3 months.
- Freezing Unbaked Dough Balls: If you prefer to bake fresh whenever you want, you can freeze the unbaked dough. After rolling the dough balls in sugar, arrange them on a baking sheet and flash freeze them until solid. Then, transfer the frozen dough balls to an airtight freezer-safe bag. When you’re ready to bake, place the frozen dough balls on a prepared baking sheet and bake as directed, adding a few extra minutes to the baking time (typically 2-4 minutes more). There’s no need to thaw the dough first!
How to Defrost Frozen Cookies
When you’re ready to enjoy your frozen Peanut Butter Blossom Cookies, simply remove them from the freezer and let them thaw on the countertop at room temperature for an hour or two. They’ll taste just as good as if they were freshly baked!
Recipe FAQ
While creamy peanut butter is traditionally used for its smooth texture, you can certainly experiment with crunchy peanut butter for an added textural element. Be aware that the cookies might be slightly more crumbly, but they will still be delicious. If using natural peanut butter, make sure to stir it very well before measuring.
Several factors can cause cookies to spread. Ensure your butter isn’t too soft or melted when creaming, and that your oven temperature is accurate. Most importantly, don’t skip the chilling step! Refrigerating the dough for 30 minutes helps the fat solidify, preventing excessive spreading. Also, make sure you’re using fresh baking soda.
This usually happens if the cookies are too hot or if the Kisses are added too late. Ensure you press the kisses in immediately after removing the cookies from the oven, when they are still soft but not excessively hot. If your kitchen is very warm, you can pop the finished cookies (with kisses) into the refrigerator for a few minutes to help the chocolate set faster.
Yes, you can prepare the dough up to 2-3 days in advance. Simply form the dough into balls, roll them in sugar, and store them in an airtight container in the refrigerator. When you’re ready to bake, take them out of the fridge and bake as directed, potentially adding a minute or two to the baking time since they will be colder.
Yes! You can often substitute the all-purpose flour with a 1:1 gluten-free baking flour blend that contains xanthan gum. Ensure the blend you choose is specifically designed for baking. Follow the rest of the recipe as instructed, but keep an eye on the dough consistency and baking time, as gluten-free flours can behave differently.
Serving Suggestions and Gifting Ideas
Peanut Butter Blossom Cookies are versatile and perfect for many occasions. Serve them on a festive platter alongside other holiday favorites, or simply enjoy them with a cold glass of milk, a warm cup of coffee, or even hot cocoa. Their irresistible charm also makes them ideal for gifting.
Package them in clear cellophane bags tied with a pretty ribbon, arrange them in decorative tins, or include them in a holiday cookie box assortment for friends, family, or neighbors. They’re always a welcome homemade gift that shows you care.
More Delightful Cookie Recipes to Explore
Desserts
Easy Cake Mix Sugar Cookies Recipe
Desserts
No Bake Cookie Recipe
Desserts
Double Ginger Molasses Cookies
Desserts
Oatmeal White Chocolate Peppermint Cookies
Conclusion: Bake a Batch of Happiness
Peanut Butter Blossom Cookies are more than just a recipe; they are a timeless tradition that brings joy and deliciousness to any occasion, especially during the festive season. Their perfect balance of nutty, sweet, and chocolatey flavors, combined with a wonderfully tender texture, ensures they remain a beloved favorite year after year. Whether you’re a seasoned baker or just starting, this recipe is accessible, fun, and guaranteed to yield smiles. So gather your ingredients, call your loved ones, and bake a batch of these irresistible cookies today – and create some sweet memories!
Tried this recipe? Leave a star rating and comment below! Subscribe to my newsletter or follow me on
Facebook,
Instagram, or
Pinterest for the latest.
Peanut Butter Blossom Cookies

Saved
Pin
Ingredients
- 1/2 cup brown sugar, firmly packed
- 1/2 cup sugar
- 1/2 cup butter, room temperature
- 1/2 cup creamy peanut butter
- 1 egg, room temperature
- 1 teaspoon vanilla extract
- 1/4 teaspoon salt
- 1 3/4 cups whole wheat flour, or you can use all-purpose flour
- 1 teaspoon baking soda
- 1/4 cup sugar, for rolling dough in
- 48 milk chocolate candy kisses, unwrapped
Instructions
-
Preheat the oven to 375 degrees F.
-
Combine 1/2 cup of brown sugar, the white sugar, butter and peanut butter in a mixer and beat at medium until light and fluffy.
-
Add egg, vanilla and salt and continue to beat until well mixed.
-
Add flour and baking soda and continue to beat until the mixture forms a dough.
-
Roll the dough into 1″ balls and then roll them in sugar.
-
Place onto a non-stick baking mat. Refrigerate the cookies for 30 minutes before baking.
-
Using a tablespoon size amount of dough shape into balls and roll each in the 1/4 cup reserved sugar until well coated.
-
Place 2 inches apart onto a parchment lined baking sheet. Bake 8-9 minutes, until lightly golden brown.
-
As soon as the cookies come out of the oven, press the kisses into the center of the cookie. Allow the cookies to cool for about 3 minutes on the pan, then move to a wire rack to cool completely.
-
Store for up to 4 days in an air tight container.
Notes
- For extended freshness, store these cookies in an airtight container for up to 2 weeks. A slice of bread in the container can help keep them soft and moist!
Nutrition
Nutrition information is automatically calculated, so should only be used as an approximation.
